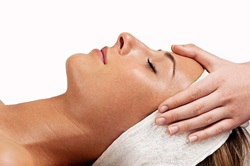
 I haven’t had a facial in…well actually; I can’t even remember how long it’s been! That explains it! Ironically, I am a licensed cosmetologist, which means I went to school for hair, skin, and nails. I have done all the above at some point during my career (I actually had a fantastic esthetic clientele before I joined the Aveda Corp. in 1990). However, since returning to the freelance business 16 years ago, I had facials with less and less frequency, which is how I arrived at my current facial dry spell.
All that changed this past week thanks to a friend and a thank you gift I received from her. The gift was for a facial at Spa Sweet. I called and made an appointment with the esthetician my friend had recommended. Once I made my appointment I started having second thoughts. What if I don’t like the smell of the product (I detest synthetically-scented skin care)? What if I have sensitivity to the product used? What if the esthetician is too aggressive with extraction? Uncertainty and thoughts of rescheduling swilled in my head. By the time I had all those conversation again and again with myself, it was time for my appointment. I walked in feeling a sense of skepticism. Sonja, my esthetician, greeted me promptly and led me back to the treatment room. After addressing my litany of questions, I was left to undress and get under the covers. That’s when “my conversion” began. As soon as I slipped under the covers, I noticed the bed was warm; YES—I can do this! Sonja was very respectful of all my concerns as well as deft at her craft. I had a wonderful experience. It was relaxing, thorough, and my skin looked great when it was over. I was impressed with the entire experience. Why don’t I do this on a regular basis? I asked Sonja some questions and I ended up buying the serum she recommended. Why get a facial? She gave me great 3 reasons: 1. Stronger exfoliation than you can get at home that’s tailored to your specific skin type. When you remove dry, dead skin cell accumulation, your skin care works better and your skin looks brighter. 2. Safer gentler extractions than you can do at home. You pickers know who you are—my advice is leave it to a professional. The main difference is during a facial, the skin is cleansed, exfoliated, steamed, and basically softened so extractions are safer and more hygienic. There’s less of chance of bruising and infection that is common in home treatments. 3. Hydration and overall health of the skin. A good esthetician can evaluate what you are doing at home and help you customize your skin care so you get the best results. Leaving you with healthy, glowing skin. Upon arriving home following my appointment, my husband noticed my skin immediately. He even asked if I was wearing some different makeup because my skin looked beautiful. How often should you get a facial? Ideally every four to six weeks; but Sonja recommends at least once a season. All I can say is, sign me up!
21 Comments
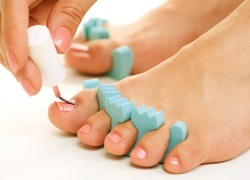 So, it’s happened! The snow is actually melting and there is the possibility of my toes being exposed at some point very soon. Truth is, I haven’t had a pedicure in months. It’s not like me to ignore my tootsies—I love perfectly shaped, brightly colored toes even if no one else can see them. Unfortunately, this year’s polar vortex has taken its toll in many ways—resignation that it may never end, and neglect of grooming (let’s just leave it at the toes)!
In celebration of winter’s retreat I made an appointment at Twin City Nails. I always walk out of there with a great pedicure, and I love that I can call and get in right away. I am not good at making appointments too far in advance as my schedule changes quickly. Ahhhhh! There is something magical about slipping my feet into that warm footbath; it’s like the winter melting away. As I was day dreaming about getting daily pedicures, I asked my pedicurist why it is that when I get them at the salon they last so much longer than when I do them at home? I was surprised that the answer was so simple. 1) Make sure the nail bed is cleanThe most important thing is to make sure the nails are really clean. Really—that’s it? Actually it is. Begin by removing all traces of nail polish, especially around the cuticle. Trim and file nails. Then soak and wash the feet, removing nail polish remover. Then push back and if necessary trim the cuticles. 2) Buff the nailsAny shine on the nails is mostly oil. By buffing the nails first, oils are removed allowing for polish to go on more smoothly. The better polish lays on nails the longer the pedicure lasts. 3) Don’t skip the base coatI NEVER use a base coat! Maybe that’s why my “at home” manicures never last either. My base coat of choice is OPI. What about color?Here are some of my favorite shades to usher in a colorful spring. · According to Pantone, the color of the year is Dazzling Blue. My favorite nail polish version is from Essie inMesmerized, a beautiful royal blue. · Another of Pantone’s colors for spring is Radiant Orchid. Best shade of it for nails is Butter London’s--Molly Coddled, an opaque, lavender orchid. · And last but not least a personal favorite—Celosia Orange MARC JACOBS BEAUTY Enamored Hi-Shine Nail Lacquer in Snap! This is a most delicious shade of mandarin orange! That’s it! Often a simple solution is all you need. Now, let’s see those toes.!  April indeed! Two weeks into spring it’s snowing outside, and to add insult to injury, the little break in the weather triggered my allergies. I know I don’t suffer alone. It’s difficult to look your best with the symptoms of allergy season so prominently displayed. Watery, itchy, swollen eyes, and a red nose say spring like nothing else. What to do?
In an emergency situation I pull out the big dark sunglasses throw on some red lipstick (to take attention away from my red nose) and try to get out of the store as quickly as possible. Unfortunately the symptoms usually last a few days. And I recently heard on the news that this year’s cold winter (polar vortex) may contribute to a more severe allergy season. I like to always be prepared, so here is my game plan to look good even on days when the pollen count is high: Doctor knows bestFirst of all if you take allergy medicine to ease symptoms, follow your doctors instructions. I don’t operate well on allergy medicine during the day, if I take anything I usually do it at night, that way I get a good nights sleep which helps alleviate puffy eyes and dark circles. I also try to up my water intake to compensate for the moisture being lost from blowing my nose and sneezing. Let’s start with itchy, puffy, swollen eyes—Give yourself a few extra minutes to soothe your eyes. Time invested will payoff in results that makeup alone can’t do. Eye drops—I use homeopathic Boiron Optique 1 Eye Drops to soothe my eyes and then apply a cool compress such as cold tea bags (I keep in the fridge) or a cotton ball soaked in cold water. This combination helps with both redness and puffiness. You can use this same technique with a prescription drop as long as you follow your doctor’s instructions. Incorporate a primerAlong with drinking more water I also incorporate a primer into my makeup routine. Primers help even out dry areas on the skin, which maybe a symptom of allergies as well as a reaction to antihistamines. Try L’Oreal’s Miracle Blur. CamouflageRedness under the eyes and around the nose can be disguised using a concealer that perfectly matches your skin tone. For days like these, I use Laura Mercier Secret Camouflage (SC-3 is my color). I love it because it’s oil free and long wearing. Each compact has two colors, which allow you to customize in order to perfectly match your skin tone. Fashionable framesIf eyes are too sensitive to apply makeup wear a cute pair of fashion frames (read no prescription) to add interest. Check out SEE in Uptown for a perfect pair of clear, prescription, or sunglasses. If your eyes feel better, use a white or cream pencil at the water line (inside the eye). This technique makes the eyes appear more open and awake. Last but not least, put on a happy face, as Marilyn Monroe said “A smile is the best makeup any girl can wear.” 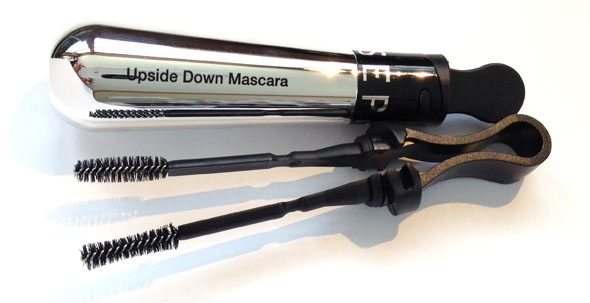
I thought I had seen everything, but lo and behold, I have been surprised! What you ask could possibility astound this beauty veteran who has seen everything? Well leave it to Sephora to bring out an innovation on mascara application. Sephora’s Upside Down Mascara has a truly one-of-a-kind applicator, or should I say applicators. Actually three in one: surround top lashes with a 360 degree application, pinch brushes together for maximum lift and volume, use smaller brush for lower lashes. I bought some to try it out, here's what I found: How it works:The wand works by placing a 360-degree application on the top lashes. After dipping the closed wand into the tube (make sure you wipe off the end because a little too much product accumulates on it), allow the two brushes to open. Carefully and gently close the two brushes around the top lashes to coat (top and underneath). In all honesty, it takes a little practice not to get mascara on the top lid, however coating the lashes top and bottom really does give more fullness and lift. Maximum volumeNext pinch the two wands together and apply as you usually would on the outer corners of the lashes to add more volume (there is no need to re-dip as wand will still have plenty of product). This mascara formula goes on a little wet but really builds to makes the lashes look much thicker. Smaller wand for lower lashesUse the smaller narrower wand on the lower lashes. It may take a little practice to use without getting mascara on the skin, but only because you need to figure out how to hold the applicator. 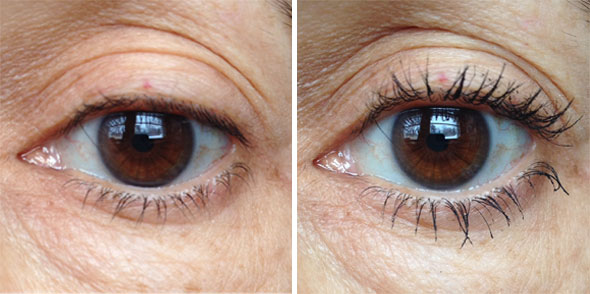
I only dipped the wand once into the tube for this application. There is no other make up on my eyes. I also have pretty sensitive eyes and haven’t experienced any irritation from this product.
Overall, I love the formula and volume it gives, even though it does go on a little wet at first. The mascara wears well without flaking or irritation, but the new applicator takes some practice to use. If you are a makeup novice I would say skip this one, but for those makeup junkies looking for something new and different give it a try. Spring is a time of renewal, so why not try a new makeup look? These beauty tips make it easy.
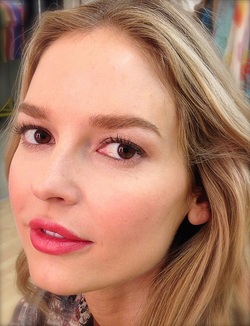
Here are some of my favorite looks for Spring 2014 @Eco Salon http://ecosalon.com/4-makeup-beauty-tips-for-spring-get-these-colorful-on-trend-looks/  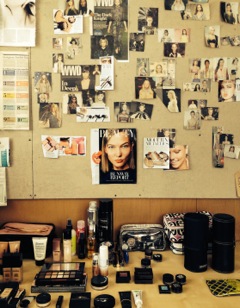 Two days until the official start of spring. Sitting at my desk writing this while I look out over my completely snow-covered back garden, it’s hard to believe it’s coming. Luckily when I turn around, I have a whole wall dedicated to spring beauty. A subtle reminder that inevitably Spring will come. Until then, I can console myself by wearing my favorite spring trend—bright lips. PHOTO BY FATIMA OLIVE I know what most of you are thinking—my signature look is pretty much bright lips, but here the similarities end. Although my typical application consists of a bright red lip, my favorite spring trend is orange. Yes orange is the new red. Orange is the color of transformation and fittingly the breakout color of spring. Here it is along with Pantone's Spring 2014 color report. Whether it’s Celosia Orange or Cayenne, you can see how it stands out among its peers. Orange is a very unconventional color. It’s a more modern version of red—infinitely wearable, most definitely fun. How do I incorporate this little bit of spring fun into my makeup routine? For those that are a little shy with color, my recommendation is to start slowly. 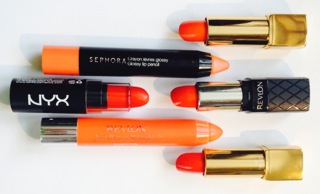 PHOTO BY FATIMA OLIVE
Gloss or a lip balm is a good introduction:
 Although makeup trends go in and out of fashion a beautifully arched brow is always in style. With so many options on how to achieve the perfect brow; Tweezing, Threading, Waxing or Shaving, how’s a girl to choose?
Consider this a brow primer and a call to action if you’ve used the artic vortex as an excuse to let brows become your arch nemesis. Tweezing - Most accurate/Least expensive*/DIY I am a big fan of tweezing because it is the most precise method of shaping the brows. Only one hair is removed at a time (at least when I am tweezing), and you can be very specific about the shape you are creating. Once you’ve created a perfect arch, maintenance is easy. (check out my post Picture-Perfect-Brows for more info on tweezing) *Least expensive once you’ve invested in a great pair of tweezers. My favorites Tweezers are still the Tweezerman brand (I’ve just purchased a pair of tweezers with a light- review to follow). The other important tool is a magnifying mirror. I can’t overemphasize the importance of the magnifying mirror especially if you wear reading glasses or if you have very fair hair. Threading – Quick/Inexpensive/Great for Sensitive skin Threading originated in India and has become more popular in the west in the last few years. Threaders use a twisted thread between the hands and mouth (yes mouth; this is what freaks me out the most, but according to experts the mouth method is the fastest and most precise). Using the thread rows of hair are removed quickly at the follicle. Unlike hot wax, threading is gentle on the skin and can even be tolerated by sensitive skin. The only draw back, because of how quickly the hair is removed, is the possibility of reckless hair removal. Make sure you go to a professional. Waxing – Quick/Longest lasting/Cleanest look Waxing is the longest lasting form of hair removal because hair is removed at the root. Waxing is very effective for thick, course hair. Over time, regrowth in areas that have been waxed may grow back softer. Waxing is more expensive than other methods initially, however the cost may even out in the long run because of it’s longer lasting effect. I don’t usually recommend waxing for sensitive skin. Always see a licensed esthetician for waxing services. Shaving – Painless/Least expensive Although eyebrow shaving is less common, small eyebrow shavers can be easily found at many drug stores and on line. This is the least painful method of eyebrow shaping and is most effective on eyebrows with thinner hair. The disadvantages are quick regrowth and stubble, not to mention if you slip (I don’t even want to think about this)! Nonetheless, many women use this method with positive results. Regardless of which method you choose, beautiful brows are the perfect compliment for Spring’s array of fresh beauty. 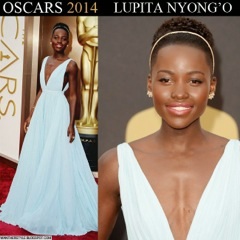 I think in some ways the Oscars are to some as the Super Bowl is to others. I don’t want throw a sweeping generalization that it’s a women vs. men thing. I know plenty of men that love the Oscars as much as I do. As it turns out the Oscar party I went to was made up of all women and their daughters (There were some boys in attendance but only by default). As you can imagine there was a lot of talking and commentary as we watched the stars on red carpet. Although we didn’t agree on everything, I do have to say a hush fell over the room as we caught the first glimpse of Lupita Nyong'o. To say she was breathtaking is an understatement. Without a doubt, she epitomized the head to toe glamour that I admire. Honestly, everything was perfect and perfectly expressive of who she is; a beautiful, elegant, intelligent, and thoroughly modern woman. And every female in the room agreed that she looked stunning (I think some of the boys did too, even if they didn’t say it out loud). A breakdown of what I loved about Lupita Nyong'o’s Oscar look. • The entire package reflected a less is more approach. • I love that her hairstyle made use of her natural texture. The simple headband framed her face like a halo. • Her make up was soft and subtly emphasized her natural beauty. • The accessories were perfectly proportionate. 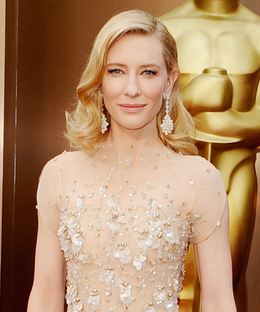 Next on my list was Cate Blanchet, or as my friend calls her, “Cate the Great.” Cate is another of my favorites because I believe she has such a wonderful sense of self. She also exudes the classic Hollywood glamour I love. Cate exemplifies “less is more.” Subtlety can be sublimely dramatic. The color and style of her gown worked perfectly with her coloring. The side part and soft waves of her hair balanced with the feminine style of her dress. Her eye makeup focused on her eyelashes rather than a heavy application of dark shadows and was complimented by the soft pink shade on her lips. This is the kind of makeup application that can work on every woman. 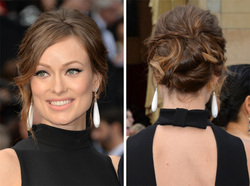 The last actress on my list is Olivia Wilde. I thought she looked fantastic. She definitely had the mother-to-be glow. Her side swept up-do was a perfect compliment to the high neckline of her gown. These two elements combined with the dramatic cat eye makeup worked to bring attention to her spectacular eye color while everything else was understated. She looked lovely and her hair and makeup could easily translate from red carpet to real life.
Why I was so attracted to these three women and the looks they choose for Oscar night? Aside from the million-dollar jewelry and dresses, the hair and makeup applications were classic, tasteful, and very wearable. Which one would you try if you had to walk the red carpet? 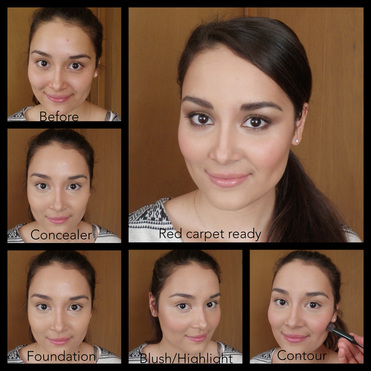 I was invited to a red carpet pre-Oscars cocktail party this weekend. It’s not a black tie event but I do love to dress up. After all, getting ready is the best part! I am lucky that I do makeup because there is never a lack of friends who want a little help or a quick touch up pre party, and for me that makes it even more fun.
Often it’s the small details that make the most difference in beauty. Using the right product, having the right tool for application, or even taking a few extra minutes to blend the makeup. These small things make for Oscar-worthy beauty. Having prepared women known and unknown for special events, I learned and developed a strategy for beautiful makeup that’s lasts all day and photographs flawlessly. Whether or not you’re attending the Oscars these tips will come in handy the next time you walk the red carpet. Flawless skin Flawless skin is the hallmark of a beautiful application. To achieve this, begin with clean skin that has been moisturized. I even do a little massage to increase the circulation, which gives the skin a healthy glow. Take note of the natural flush of the cheeks and choose a blush shade in this range. Primer Start the application with a primer appropriate for your skin (i.e. oily, dry, etc.) this will make the foundation go on smother and look fresh longer. Then apply concealer as needed to even out skin tone and diminish imperfections. I often rely on Giorgio Armani Luminous Silk Foundation or Makeup Forever HD Foundation formulas for these types of occasions. Both of these foundations create the illusion of perfect skin without looking mask-like. I apply with a foundation brush and then use a beauty blender sponge to create the perfect canvas. Once the skin looks flawless apply a cream blush on the apples of the cheeks. Highlighting and Contouring In order to give the face a more sculpted appearance, especially in photos or on screen, makeup artists use highlighting and contouring usually with different shades of foundation. This is a more advanced technique and there is a fine line between subtle and conspicuous. An easy way to get the same effect is to lightly apply a highlighter such Stila All Over Shimmer Liquid Luminizer along the top of the cheekbones, at the brow bone, and on the philtrum (the midline groove in the upper lip that runs from the nose to the top of the lip). Blend well and be careful not to apply the highlighter under the eyes area. In order to transition from cream products to powders, I use a loose translucent powder (Sonia Kashuk’s Barely There loose powder in Naked is my favorite). Use a brush to lightly dust the face then use a powder puff to press the powder along the T-zone. Cheeks and Eyes Next, layer a powder blush over the cream for a longer wearing more natural flush on the skin. To contour, use a bronzer such as Nars in Laguna just below the cheekbones and at the temples. Make sure this is all done subtly and is very well blended. Finish the face with a classic smoky eye complimented by a neutral lip or bright red lips paired with a neutral eye either way you are sure to make a grand entrance.  I am in Miami this week working and visiting my family. On Sunday, as I sat on the couch cheering and rooting on the athletes competing in the Olympics, my great niece Vanessa asks; “what is it about the Olympics?”
What makes me so excited about the Olympics is The thrill of victory...and the agony of defeat...the human drama of athletic competition! I grew up with ABC’s Wide World of Sports and the words and images from the introduction were indelibly etched into my subconscious. Even as a child, I understood the dedication and sacrifice that constituted the “human drama” and I wanted to applaud the effort. I love cheering people on. I have been known to show up at random spots on the course during the Loppet or Twin Cities Marathon (as well as other events) to cheer on friends and strangers alike. Last week, I was in a hotel room cheering so loudly for Julia Mancuso (USA’s Bronze Medalist in the Super combined), I thought the hotel would send security to my door and ask me to quiet down. Here’s my favorite part; Julia flies down the hill during her last run—gets to the bottom of the slope, whips off her ski mask, and……“Is she wearing sparkly eye shadow?” YES……yes she is! I love a girl that loves a little sparkle; as a matter of fact her brows are beautiful groomed. There has been a marked improvement in the quality of hair and makeup in the area of the Olympics, I consider the glam event: Ice Skating. The garish make up of the past has evolved into applications that are both artistic and modern. Applications equivalent to beauty we see on the pages of fashion magazines. Check out Meryl Davis gold medalist of the USA Ice Pairs Ice Dancing or USA’s Gracie Gold. But the Alpine events? The Snow Boarders and Luge? Even there, most of the girls are getting a little glam on. Is it in this age of social media and selfies, we have realized that it’s important to look good all the time? Or could it be and as I believe, looking your best makes you feel more powerful? Who knows, maybe a little sparkly eye shadow can make you fast enough to win a medal, or at least make you feel like you just did. By the way, Julia Mancuso also brought her own tiara to the Olympics. What you need to get the look:
|
Have a question just ask me.....
Archives
January 2017
|
 RSS Feed